Friday, January 31, 2020

2014 Nissan Altima S 2.5 Stalls At Idle

One of my good customers called with a description of stalling after a start at idle, battery light and a lot of corrosion at the battery terminals. I thought the stalling problem might be too low an idle rpm and suggested the one foot for braking and one foot for keeping it just off idle to raise the rpms. That worked well enough to get the car to the shop. When I drove the car inside there was no stalling or low rpm. In fact it ran very well but there was a check engine light. A light means a code. A code might be a clue to what had been going on.


A P0101 MAF sensor code was stored and actually is a pretty common fault code on these cars. So common in fact there is a technical service bulletin that suggests an updated PCV valve and a possible ecm flash update, depending on ecm part number.  NHTSA ID: 10119177
TSB ID: NTB16-030a 
That being said, nothing about the known P0101 problem would explain the stalling complaint. Also, the manner of driving with one foot on brake and the other on the accelerator could have set the code. In the few minutes I was with key on checking for codes the car battery voltage had lowered enough that the car powered down to save battery voltage. This brought me to what Danny (customer) had said about the battery condition. I decided to let the P0101 aside for now. I had another idea about the original complaint and its cause. I should explain that a car has a learned memory or an updated one that stores slight adjustments over time to compensate for wear or tear that has taken place since it has been getting older. If you reset the memory it goes back to before the learned behaviors and then has to relearn the adapts. One very common thing to happen over time is a buildup of carbon at the air intake throttle body and throttle plate. The buildup was slow and the idle strategy adapted to it to keep the car idling at a proper rpm. Clearing the adapts on a car that has a dirty throttle (carbon) will cause the car to stall at idle until the relearn adapts OR until you clean the carbon. If you clean the throttle the idle will not have to be relearned but will already match the reset strategy. I suggest cleaning the throttle after a reset. 
The battery here had not been disconnected and the battery had not failed to crank the car. You might wonder then why am I thinking of a problem with throttle carbon buildup and memory resets. A weak battery can drop voltage low enough during a crank to reset the learned adapts. Seriously. I've seen it more on a Dodge than other models so they may be more sensitive to it. It isn't just reset either. Some codes can set on a start that were a result of battery voltage dropping too much during an engine crank. The rule of thumb here, for me anyway, is that if the voltage drops lower than 10 volts during cranking its a problem. 
The plan was now to see if this battery was dropping too low on a crank and if the throttle plate was carbon dirty. Those two things and I'd have evidence this was the problem. 


The battery voltage starts at the left, the drop is down to 7.84 during the crank and then once the engine starts the voltage is output of the alternator. So yes the voltage is going low enough to reset the adapts and I do need a battery. But I need to see carbon buildup on the throttle to explain the stalling. 


Especially sensitive to any carbon is the edge of that throttle plate. Cleaning the throttle and replacing the battery should be the fix. At least it can't hurt. 


Cranking voltage with a new battery.


The P0101. I cleared the code and after 3 trips it had not reappeared even as a pending code. I decided not to pursue further. 

Thanks for reading!

Kenny@ggauto.repair


Thursday, January 30, 2020

'92 Astro Van 4.3Z (repost from 2008)

Diagnostic Tech: '92 Astro Van, 4.3Z

I had a '92 Astro Van come in on the hook for a no-start. The engine was a 4.3 with throttle body fuel injection. The owner said the van had been stalling and sometimes failing to start for some time now. He had replaced the fuel pump and filter because he though it seemed to be running out of fuel. No testing had been done and the same problem remained after the fuel pump replacement. When I turned the key on I could hear the fuel pump run. Turning the key to start engaged the starter, the engine spun nicely and .... it even started right up! It isn't uncommon for a no-start to be towed in and then start once it gets here. I'm sure there is an applicable Murphy's law for that.

What I did notice though was an intermittent engine cut-out. A sure fire sign of a secondary ignition problem. Even though the van owner was still sure he had a fuel problem, I decided to take a look at the ignition system. On the Astro Van the ignition system is easy to access once the engine cover is removed. I immediately saw what was probably causing the cut-out symptom I had noticed. There was a burn mark where the secondary spark from the coil wire had been jumping to a vacuum hose instead of following the intended path to the distributor cap. That meant the resistance in the secondary, downstream of the coil wire was so great that the spark found it easier to jump to the vacuum hose. A mental list of plugs, wires, cap and rotor was forming in my mind.


As I began the work of replacing the secondary ignition parts I began to be amazed that this engine was running at all. The coil wire tower in the cap was completely burned away.


The rotor was burned through and the distributor was severely corroded.


After a cleaning with electrical contact cleaner and penetrating oil the distributor was found to be in good condition. I replaced the spark plugs, spark plug wires, distributor cap and rotor. The van ran very well after that with no more stalling or cutting out. At 264,000 miles I wouldn't be surprised if it did need that fuel pump as well.

Kenneth Hayes
kenny@ggauto.repair

Originally posted 2008 for carfix online.

Tuesday, January 14, 2020

1995 Ford Checks: OBDI EECIV

1995 Ford F250 XL w/5.8 engine uses the EECIV engine control system. If you are going to use the EECIV system for self tests you need to know a bit about the system. The first thing to do is have the engine at operating temperature, better known as warmed up. Before doing so, remove the radiator cap and check the radiator is full. This particular truck was low of coolant, about a half gallon low. Pressure testing showed some slight coolant seepage at the radiator and the intake manifold. For now we will fill the radiator, start the engine and let the coolant temperature reach normal operating temperature in preparation for the self tests.


Ford self-tests on this system start with KOEO, key on engine off tests. Trigger the test and the truck runs a series of pre-programmed tests and outputs the results. Other than your beginning the sequence and listening to the noises as the tests proceed you are just an observer. Think about it though. KOEO codes/results are LIVE. Any results are for the current time and the current tests. 
Let's run through a KOEO test. The diagnostic connector is at the fender, under the hood and I do have a compatible scan tool. 


The engine is warm, the coolant level is full, the oil level is full and the battery is charged. Those are the prerequisites for tests.


 What are fast codes? If you run KOEO in fast codes you won't see the code output. The scan tool will capture the codes and place them in the "review codes" section for your later perusal. 


Slow codes is more like counting light flashes. You can count the pulses as the code is output. Here we have 1 pulse, pause, 1 pulse, pause, 1 pulse or 1 1 1. 111 System pass. The initial single pulse before the slow code output is the fast code output signal.


Cool huh? Now that you understand KOEO testing, I'll just mention there is more to it. There are actually two parts to KOEO tests. The first part, the part that outputs live codes is called KOEO On Demand. On Demand is the live codes for faults present at the time of the test. The second part of the KOEO test is called Keep Alive and is basically memory codes stored from previous faults. Keep Alive codes are output at the end of the On Demand codes. If you were counting pulses (slow codes) you would see a single separator pulse followed by any stored Keep Alive codes.


Make note of your Keep Alive codes because they are fragile. Sometimes just ending the test will remove the code so remember it had a code in memory and in this case it was 123. Now because Ford doesn't trust us to know the details of the self tests that were performed and because we got a system pass in the on demand codes we make a reminder that we have a 123 in keep alive and move on to KOER code tests because that is the proper sequence as designed. If there were on demand codes you would diagnose and repair those first then start over with the KOEO tests.
KOER tests also require the warmed engine, charged battery and full fluids. Most scan tools will request you to run the engine 3 minutes at 2000 rpm just prior to the test. You'll need to turn off accessories like heater/air to prevent false codes. If your scan tool is worth using it will walk you through the tests because KOEO tests are more interactive than the previous. At the prompts, run the 2000 rpm event, shut off the engine, start the engine, there will be a series of beeps to identify the engine cylinder number, 4 beeps for this 8 cyl., after the cyl id press the brake and release, turn steering wheel half turn, press the cruise set switch and the overdrive switch (as applicable). Then relax for a bit. The rpms will drop very low and a few seconds later you will be asked to "goose the throttle" which is ford tech speak for punch the accelerator to the floor and release very quickly. The tests will complete and you will get results. In this case I got another 111 system pass.
So now I have passes in both KOEO On Demand and KOER tests. The truck complaint was a hunting idle rpm and a check engine light. On the way to the shop though it ran fine and the light was out. So far that is the same here even during the checks. We have the 123 code in Keep Alive and by the book that is where to go but I suspect this problem is intermittent and the code may not be helpful. 123 would be the throttle sensor signal voltage too high which apparently was not the case in KOEO On Demand or during KOER since it ran fine.
Next step then, see what the tps signal voltage is. Not all old Fords have a datastream available but this one does.


Let me quickly touch on datastream. The scan tool has tapped into some of the data available from the engine computer. The data exchange doesn't look that nicely sorted and displayed between the two computers (ecm and scan). It would look like this screen capture of the exchange.


Within that datastream is what the engine computer thinks is going on and the information is being presented to you by the scan tool in a format you can understand. Before datastreaming you had to measure signals at the engine computer connector. You have to bear in mind when looking at scan data that it isn't necessarily the actual sensor signal present at the connector. For that you'd need to verify with a meter at the connector. What the scan data strength is sometimes though is that you are looking at what the computer sees going on, right or wrong. That insight can be helpful because you won't measure it, you have to see it in the scan data.
It can be hard to reach the computer connector, use a meter and properly identify the pins. Here is a Ford *breakout box* to help in that task. Connect the box between the ecm and ecm connector then use the box to access pin circuits.


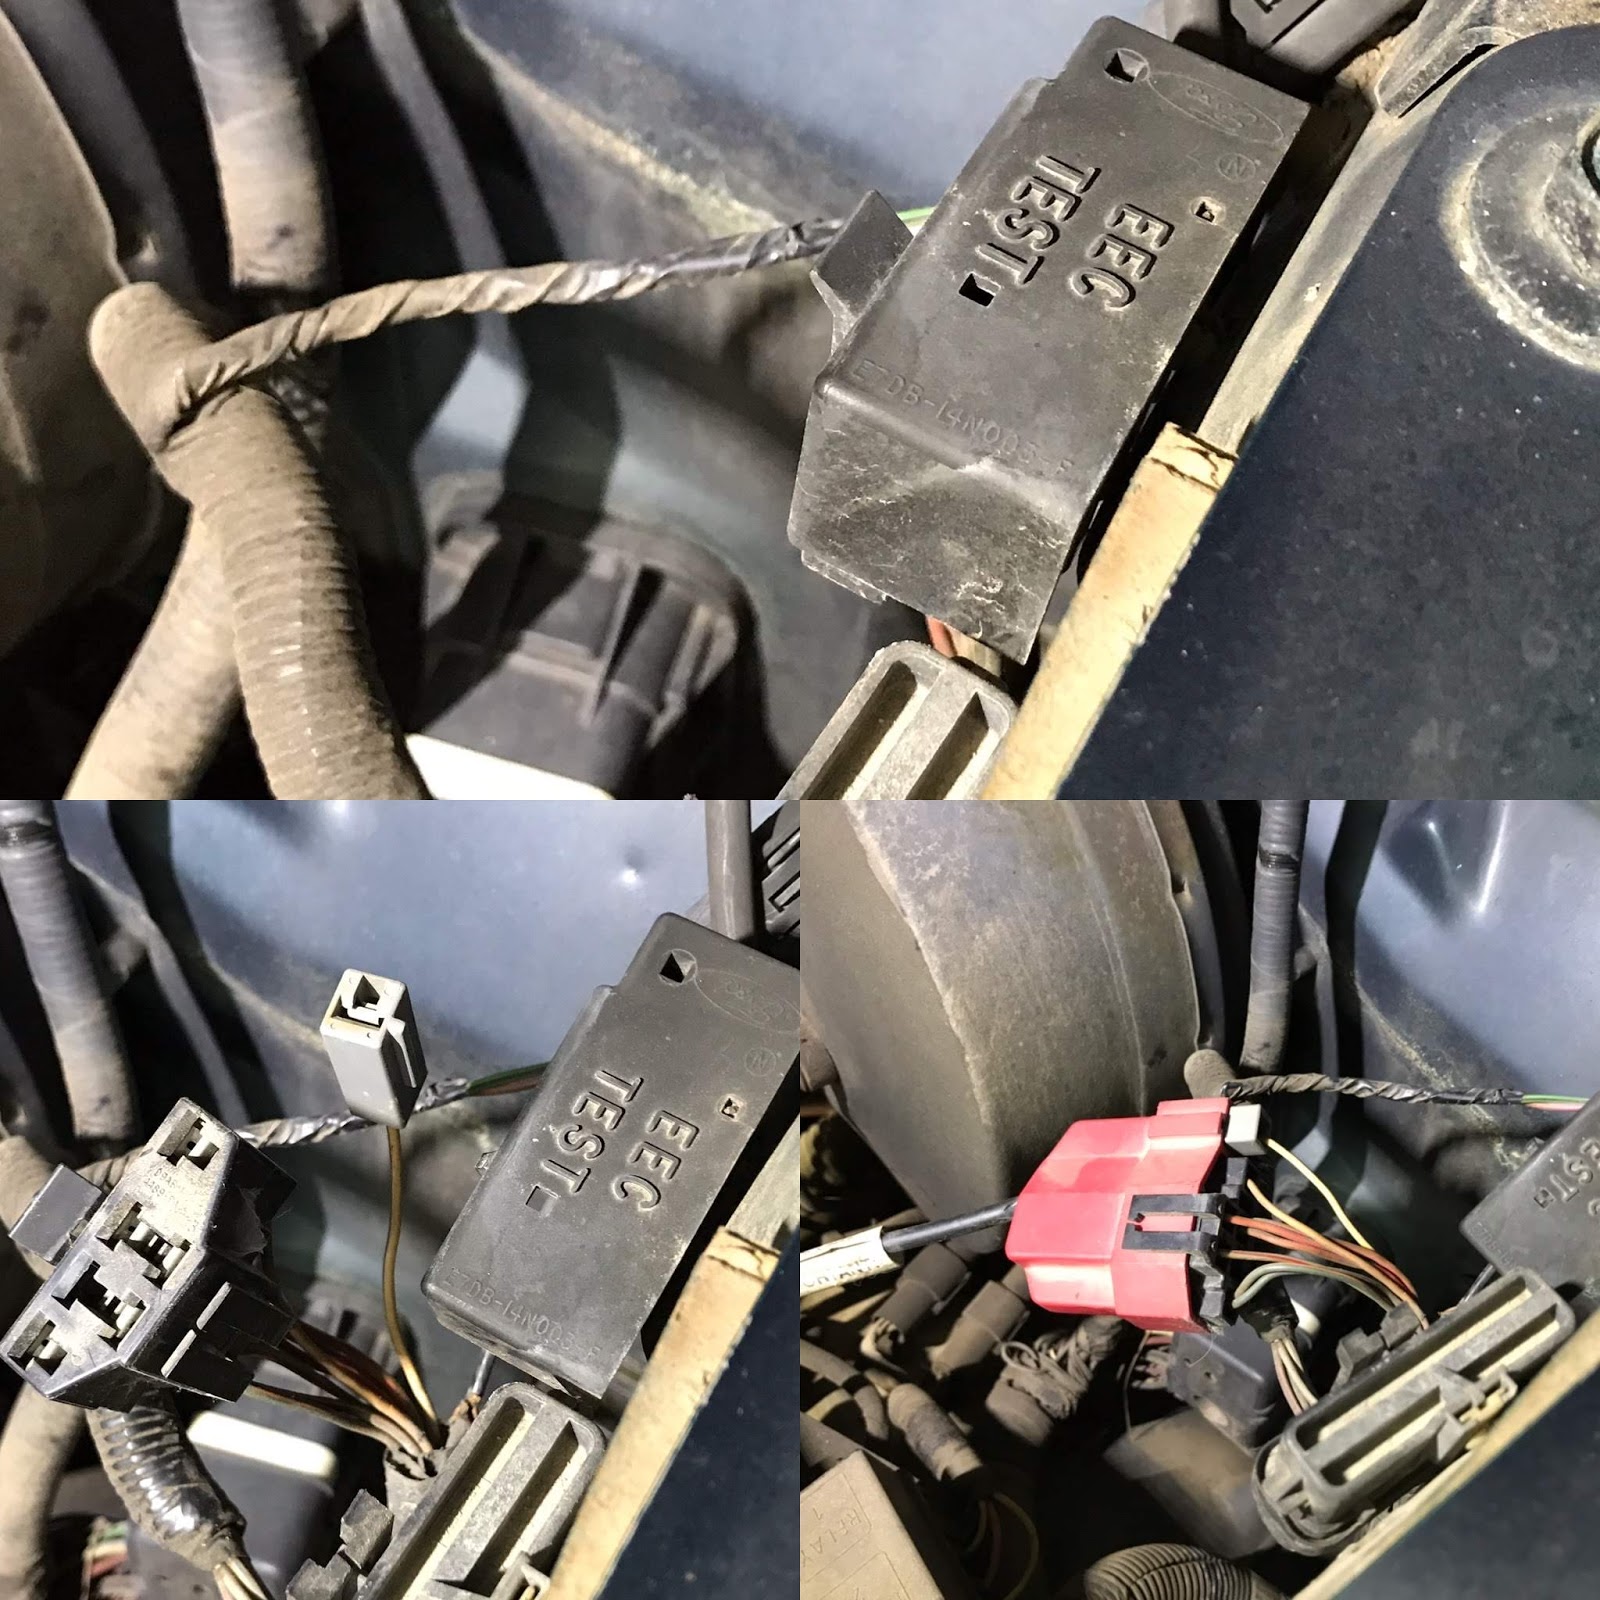
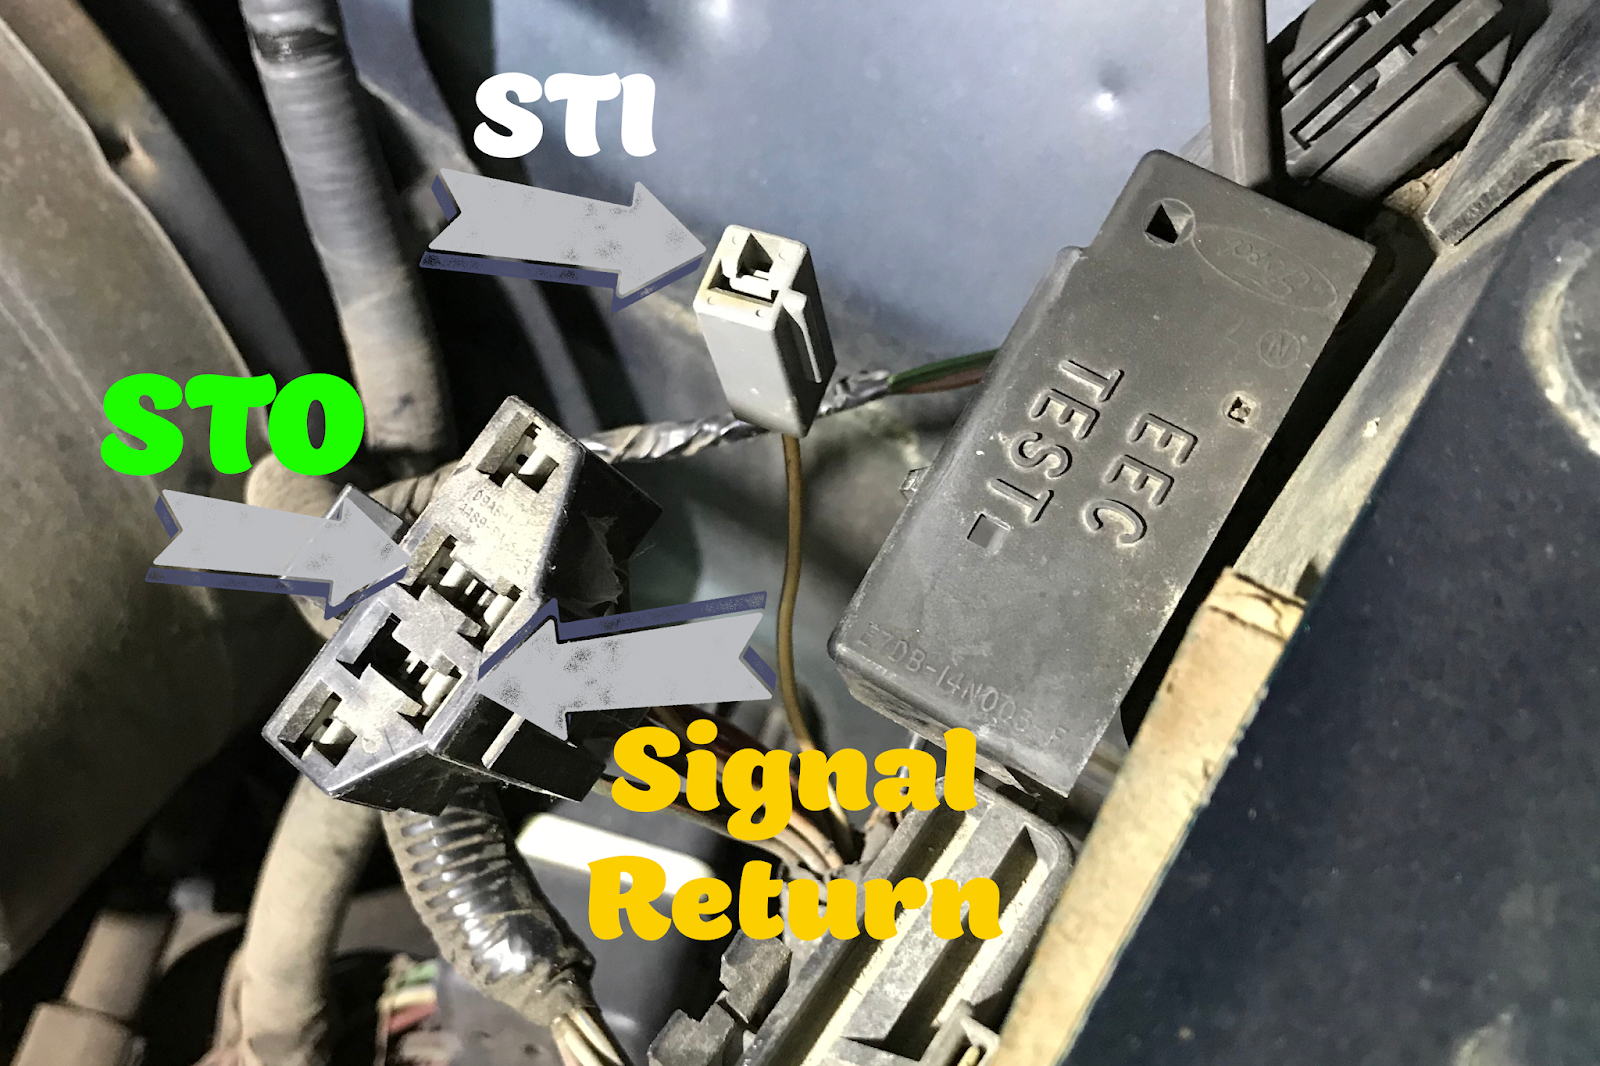
Now, you won't see scan data without a scan tool but you can measure pin voltages at the ecm with a meter. You can also run Ford self tests without a scan tool. You can use a voltmeter. Remember all those pulses during the scan tool code tests? Works the same way with a voltmeter but you'll need to know what the pulses mean when the needle sweeps. Hook the positive lead of your voltmeter to the positive battery terminal.  Hook your negative lead to the STO terminal of the diagnostic connector. Use a jumper wire to connect the STI terminal to the Signal Return terminal. 


When you turn the key on the KOEO test will start and the pulses will become needle sweeps. The first needle jump will be the fast codes, followed by (in this case) sweep, sweep, sweep. 1 1 1 or the 111 pass. Two 111 code sweeps followed by the separator sweep and the KOEO Keep Alive codes. You can even run the KOER tests. As I said though you'll need to know what is expected of you during the tests. Still, very neat. Here's the initial KOEO sweep, fast codes followed by 111. 


If you saw my post on quora about reading GM codes with a paper clip well you can also do that with a Ford however it is more complicated because it triggers the Ford self tests which as you have seen are more than just code flashes. You need a wire paper clip. No voltmeter or jumper or scan tool. Bend the paper clip into a U shape and use it to connect the STI and Signal Return.


Now when you start your KOEO self tests you'll be watching the check engine light flashes instead of pulses or needle sweeps.


Hope you find that interesting or at least informative! Back to the Ford truck problem though. I haven't seen the truck do anything wrong and the throttle position sensor output is fine. I'm not out of options quite yet.


Ford has more tests available so there is a bit of wiggle room.


Sorry.
Wiggle test state lets you shake, pull and tug on wire harness and connectors while the system monitors voltages for change. Nothing found though. A few more test drives and still nothing. I may have to let this one go with no fix at this time. But didn't we have fun?!

Thanks for reading!

kenny@ggauto.repair


Friday, December 20, 2019

When your brake pedal sinks.

2001 Saturn SL1 : Brake pedal sinks complaint.
I found the brake pedal going to second stage and not sinking from there. Usually this is a hydraulic problem so you want to check the fluid level. If the reservoir is full, it may be an internal master cylinder problem. If the fluid level is low you may have a leak in the system.


The reservoir is empty but the area around the master cylinder is dry. We need to inspect the brake hydraulic system and look for where this fluid went.
We're looking for a wet spot. A leak at one of the wheels will usually show up on the inside of the tire.


In this case, right rear wheel.

This car has drum brakes in the rear and the fluid is coming from inside the drum so the leak will be a wheel cylinder.


The shoes have a lot of pad material but it is saturated with fluid. We'll need new rear shoes and wheel cylinders. The drum is in good shape so we'll clean and reuse. If we try to reuse the brake shoes after this fluid saturation they will tend to grab and not apply smoothly. The other rear wheel, which has dry shoes will apply differently as they no longer match. Brake shoes come in a set, replace as a set. The wheel cylinder on the left rear doesn't appear to be leaking but is the same age and conditions as the one on the right. If it isn't leaking now, it will soon be.


Now, this left side looks okay but we'll be replacing it and the shoes for the reasons I've said. I wanted to show you something else though while I'm here. Because there is no fluid visible on the outside of this wheel cylinder does not mean it isn't leaking. The leak has to get past those outer boots before it is visible. So peel the boot back and look for signs of wetness. If there is fluid inside the boot, the cylinder is bad.


Both wheel cylinders, all brake shoes, clean drums. Not finished inspecting yet either. Just as you don't want to do one wheel when both need service, you don't want to do only rear when front need service so we'll be inspecting the front brakes as well.

Pull both front wheels and inspect front disc brake pads, both inside and outside pad. No problems here.


Okay. Lets get some parts and fix these rear brakes!

Thanks!

Kenneth Hayes

khayes@ggauto.repair


Friday, October 25, 2019

When One Door Closes (Battery Drain)

I love a good mystery!

A 2007 Ford Escape XLT 2.3 4x4 keeps draining the battery. After a battery boost the customer was able to bring it in. I put a low battery charge on it overnight. The first thing you want to know when looking for electrical system problems is that you have a fully charged, good battery. All of your testing is based on that.


Once the battery was fully charged I did a quick test that I had alternator output. Just watch that the voltage at the battery increases once the engine is running.


Next up was to test the battery but I would need to disconnect it from the car before testing because if there was a system on the car causing the battery drain it could interfere with the battery testing. I didn't want the system to lose power or memory but I didn't want it connected to the battery. Fortunately there is a tool for just such a situation!


The memory saver provides alternative power to the system so that I could disconnect the battery for testing. Just connect it to the diagnostic link under the instrument panel. There was no problem with the battery.


The battery was charged and good. The alternator was working. I put the cables back to the battery and disconnected the memory saver. After the basics checked out fine it was time to measure actual current draw on the battery. You have to allow a reasonable amount of time for system modules to timeout and go to sleep. If you start testing current draw while a module is active you will be looking for a system problem that isn't a problem but a normal condition. The amount of time that is reasonable varies. You can try a test after an hour, or less if you are in a hurry but if the draw is high don't get excited about it at first. Just wait another hour and check again. If you still see too much draw after three hours you are safe to go ahead and trace it down. I use an amp clamp to get the measurements so that I don't have to break a connection and trigger another wait for a timeout. This vehicle had two leads off the negative post. Depending on circuitry, the excessive drain can be on either lead so measure each one at a time.


I did have higher current draw on one lead than the other but 58mA isn't excessive. Apparently this was an intermittent problem because up to that point I saw no reason for the battery to be going down.


I mentioned that I try not to disturb circuits when testing for draw because of the added time waiting for timeouts if a system wakes up. I'm not sure if you are aware how a door latches but there is a striker on the body.


When you close the door the latch in the door closes over that striker and holds it closed until you release it with the handle.


Now a few cars still use door jamb switches to know when the door is closed. The closed door pushes a button in and from the position of the switch the system can tell the door is closed.


Most cars though, and this Ford Escape in particular use a switch that is part of the door latch to determine if the door is closed. Typically on a job where I'm trying to trace excessive current draw I'll be disconnecting things, removing fuses, etcetera and I don't want the added aggravation of triggering draw based on my opening and closing the driver door so I close the latch with a screwdriver and leave the door open. As far as the system is concerned the door is closed and I'm free to enter or exit as needed. Is that somehow related to quantum physics? The door is open, yet it is closed. No clue. Anyway there is a reason for expaining the door situation.
Since the problem was intermittent and not making an appearance at the time of the draw test I needed to take a look at the stored memory of the vehicle for clues. That possibility is why I had used the memory saver to keep the stored information from disappearing. I turned the key on and connected a scan tool and entered the vehicle information, preparing to scan the systems. When you turn the key on but don't start the engine there are warning lights that come on for a few seconds as a bulb check, then go out. I noticed something that looked odd here though. The door ajar light stayed on. I thought maybe it was because the engine wasn't running but it stayed on with the engine too. I had noticed the dome light was turned OFF early on. If I moved the dome switch to DOOR position it was staying on. Occasionally the warning light and the dome light would go off as they should but it never stayed working more than a few seconds at a time. I spent a bit of time inspecting latches and opening and closing doors. I know of a Ford problem with the latch switches getting dirty and sticking but spraying lube/cleaner wasn't making any difference.


I decided I probably had a bad door latch switch but I wasn't sure that would be the dead battery problem because the dome light was turned off and most Fords will time the power off before it kills the battery in that situation. My mind was thinking this anyway, lol. I did have the scan tool hooked up and ready though so I took a look. I had three "battery voltage low" faults. One for the restraint control module, the instrument cluster and one for the general electronics module (GEM) which on this truck has an alias of SJB or smart junction block. I didn't think low battery voltage codes seemed clues since the problem was a dead battery. I would clear those later but I decided to take a look at the GEM data because the GEM is in charge of monitoring those door latches. Maybe I could see which door the truck thought was open. Well that was interesting! There may be a problem with that right rear door.


Ford has the PATS, passive anti-theft system that is supposed to deter a thief stealing your car. The PATS system uses programmed ignition keys and most people are aware of it. There is also though a perimeter anti-theft system to deter breaking into the car. There are nuances but basically the perimeter system arms when you lock the car. If a break-in occurs it will set off an alarm with horns and lights and log in the system as an "alarm event". I'm not sure what the limit is on how many alarm events will store but here I had eight events stored and each involved the right rear door. I doubt that the problem was a thief repeatedly opening the right rear door. I'd thought it more likely that the door ajar problem was in that door latch.
I still wanted to pull up the right rear door latch data item but I found only front doors available on either the Solus Edge or the OTC Encore. I found the pid available on the Autel MX808 however. This is why you need several scan tools in this business. No one scan tool is going to be helpful in every situation. It's kind of like thinking you'll only need one wrench.


I removed the right rear door panel to access the wiring connector at the latch. The black wire with white stripe is the ground. The pink with light blue stripe is a reference voltage from the GEM. It the door is open the switch is open and voltage on the pink wire. If the door is closed the switch is closed and the pink wire goes to ground. The other two wires are for the power door lock.


If the reference voltage from GEM to switch was good and if ground to switch was good I should be able to open the door and see battery voltage on a meter connected at the switch connector.


So the GEM, reference and ground circuit to the latch switch were good. I wanted to see what the latch switch was doing. It is supposed to close and ground out the reference voltage when the door is closed. That didn't quite happen. The switch was doing a poor job. BTW the GEM still saw the 4 volts as an open door.


Bad door ajar switch verified. This is part of the latch and power door lock assembly. If I grounded the reference voltage myself by twisting the two wires together the GEM should see a closed door. Of course that would mean when you opened the door the GEM would not notice but the door locks would still work and no more phantom right rear door alarm battery drains.


In this case we did the fix that best fit the customer's budget. Case closed, er.. door closed.

Thanks for reading!

Kenny@ggauto.repair