Thursday, December 30, 2021

OBD II Modes: ($04) Clear Emissions Related Data

 OBDII is a set of standards and practices used to fine tune emission programs across vehicle makes and models. OBDII Mode 1 is for requesting and displaying current emission related scan data. Mode 2 is for requesting Freeze Frame data. Mode 3 is for requesting emission related trouble codes. 

Mode 4 is for clearing emission related data in modules that store OBDII information. Mode 4 is for clearing trouble codes, freeze-frame data and stored test data. Mode 4 also resets all the monitors and turns off the check engine light. 


Kenny@ggauto.repair


Wednesday, December 22, 2021

OBD II Modes: Mode 3 ($03) Request Emission Related Trouble Codes

OBDII is a set of standards and practices used to fine tune emission programs across vehicle makes and models. OBDII Mode 1 is for requesting and displaying current emission related scan data. Mode 2 is for requesting Freeze Frame data. OBDII is concerned with emission systems but understanding the system can often help with diagnostics. 

Mode 3 is for requesting emission related trouble codes. OBDII codes are prefaced with P0 and are defined by accepted definitions for Generic or Global OBDII. A query for OBD II codes should return the number of modules online responding and which module is responding. You won't get codes from modules other than those containing the OBDII emission data. 

This demo picture is showing 1 ECU module communicating via J1850 protocol and that it is the Engine Module. A Mode 3 request for codes returns the P0 prefixed codes for OBDII emission test failures.


Important to bear in mind when retrieving trouble codes is that they do not indicate parts that need replaced or what is wrong with the car. They indicate failed tests. Diagnostics are the steps you need to take to determine why the tests were failed. But, gathering data is part of the diagnostic method so it's a good start. 

Kenny@ggauto.repair

Monday, December 20, 2021

OBD II Modes: Mode 2 ($02) Display Freeze Frame Data

OBDII is a set of standards and practices used to fine tune emission programs across vehicle makes and models. We covered Mode 1 which is the ability to request current data display. Mode 1 data is actual data, not enhanced or altered. However, because OBDII is an emission standard and not actually a diagnostic program your available data items are limited.  

OBDII Mode 2 is the request of Freeze Frame data. When an OBDII trouble code is set a frame of data is captured at that time. Mode 2 allows the Freeze Frame to be called up for viewing. It can give an idea of the conditions that were present at the time of the fault. There are limited data items, and the frame is not a millisecond of data capture but over the period of a few seconds. Still, the information can often be helpful to diagnostics even though it isn't designed specifically for that. An example would be Freeze Frame for a lean fuel condition. If the Freeze Frame shows the code conditions to be heavy acceleration/ high fuel demand then you can suspect a fuel delivery problem. If the conditions were at idle or low fuel demand then you can suspect a vacuum leak. If you couple that vacuum leak with presence at cold engine temperature then you may even narrow that leak down to an intake manifold sealing problem. 


Kenny@ggauto.repair


Wednesday, December 15, 2021

Data Driven Diagnostics: IAC Counts

The IAC counts over 30 to maintain engine idle rpm indicate a problem. The most likely is carbon buildup on the throttle plate. 

Before cleaning throttle: 


After cleaning throttle:


Kenny@ggauto.repair

OBD II Modes: Mode 1 ($01) Display Current Data

 OBDII is a set of standards and practices used to fine tune emission programs across vehicle makes and models. It isn't a diagnostic system, it is an emission program. Knowing how OBDII is set up though can often be useful when you actually are doing vehicle diagnostics. There are 10 modes to OBDII. Generic or Global OBDII Mode 1 is there to display current data. Key to know here is that Global Mode 1 data is the actual sensor data as seen by the computer. If you are in OEM datastream, or Enhanced OBDII datastream you may not be seeing the actual data. In those modes, sometimes signals are substituted by default. Not all scan tools (or code readers) can read data and not all can read the various types of data. OBDII Mode 1 is limited to emission related data, yet it is *actual* emission related data. 


Remember that Global OBDII Mode 1 is actual data. 


Enhanced OBDII or OEM data can have substituted or default sensor data. Just something to be aware of when chasing car problems. 


Kenny@ggauto.repair


Thursday, August 26, 2021

Car Batteries: Some Things To Know

 Did you know that new car battery you just bought may not be fully charged? 

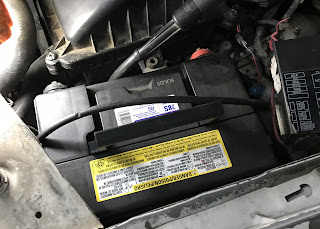
Batteries lose some charge over time sitting on that shelf. They even have a shelf life and can go bad. So, especially with car batteries new doesn't necessarily mean good or fully charged. I'm not a parts store. I'm a repair shop. I only keep on hand a few (five) of the most popular batteries. But I run the trickle charger through the bunch at least once a month and test each one at that time. When I have to get a battery delivered I test the battery and the charge state before I install it. I've learned a few things like that over the years. You don't want to put a discharged battery, or a bad one on a car and cause the alternator to have to overwork to charge it. The alternator isn't on there to be the battery charger. Which brings up another point.... 

You may have another problem that caused the battery to fail. 

 Once you have installed the correct, fully charged, good battery with clean, tight connections and proper mounting, you'll need to test the charging system and measure current draw. 


Kenny@ggauto.repair
50+ Years, Searcy


Monday, June 7, 2021

"How much to charge my A/C?" Translated

Inevitably during the summer I get calls to ask if I can charge an A/C. The next question is "How much does it cost?" Seems simple I suppose but it's not easily answered without more information. On my side of the fence, I need to know what the specifics of the car are because they don't all hold the same amount of refrigerant. I need to know how much refrigerant is already in the system. I need to know why the caller thinks it needs refrigerant. I need to know what work has been done, if any. I need to know that no "sealer" has been added. Bearing in mind from experience that the back and forth here can go on for a very long time, there is a point early on that I just suggest letting me check the A/C to see what is needed. The "How much to charge my A/C?" will boil right down to "My A/C isn't working. What will it cost to fix?" The sooner we can get down to me checking the actual car, the better for all parties involved. 
An odd thing I've noticed over the years is that some people, for whatever reason, don't want you to see what the car actually needs. I have no answer for that. But I also can't help with a price quote for an unknown problem. Sorry.
So... just what happens once the car gets in the bay. I'll give the A/C refrigerant system a good visual inspection. I'm looking for signs of a leak, belt condition, compressor clutch condition, anything obviously broken, damaged or a problem. Refrigerant leaks usually bring refrigerant oil to the area and the oil attracts dust and dirt so looking for oily residue can show you where a leak exists. 

This older R12 unit has leaks at the compressor and the manifold hoses:


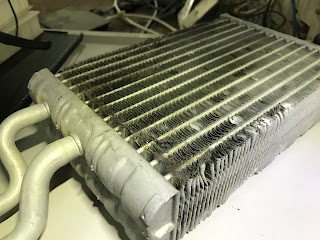
Evaporators are not easily seen visually inside the car but this one that has been removed has easily seen oil residue:


 Most cars these days have a fluorescent dye added to the refrigerant. This high side fitting cap has oily residue indicating a leak and fluorescent dye showing up using a special light and glasses:


 There was a dye present in that evaporator as well:


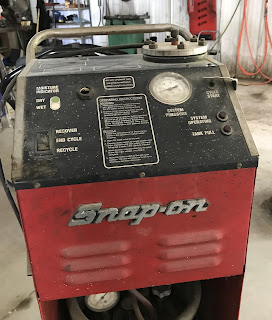
Depending on results up to this point, the next step may be to recover refrigerant or it may be to evacuate the system. Time to see what is going on inside the refrigerant system. Cue the "dedicated recovery/recycling machine" that every professional shop is required by law to own and maintain. Actually there are two generations of the R134A - R12 units, second generation being much improved on actual refrigerant measurements.  

R12 only (museum piece at this point in time) :


R12 AND R134A Dual Refrigerant Unit:


The current R134A Unit:


If you think it is inexpensive to do car repair you would be very very wrong. Anyway... we'll connect the machine to both the high and low pressure A/C fittings and watch the gauge pressures. Pressure readings don't tell you how much refrigerant is in the system. Just that *some* is. You might think no pressure would mean *empty*. Well it means no refrigerant but technically the system is full of air. If the system shows no pressure I'll be evacuating the air, pulling a vacuum on the system to remove the air and the moisture. If the machine pulls a good vacuum, -26 to -30 in, then I'll let it stand and see if it will hold that for a half hour or more, as time allows. Holding vacuum lets me know that the system won't be letting refrigerant out as fast as I'm putting it in. A good thing to know BEFORE charging the system. While the vacuum is there, and before I charge I'll sometimes add 1/2 to 1 oz. refrigerant oil. Depends on how much refrigerant oil I've seen in the leaking areas. If I've gotten this far and seen no reason not to charge the system, then I'll do just that. Charge the system. I want to know that the system works when fully charged, or if there are other problems. If I can tell the system is not only leaking but needs a compressor, or has a plugged condenser, etc. I'm a step ahead and can inform the customer accordingly. 

This system had no pressure but did hold vacuum for a half hour. There was some very slight dye residue inside both front and rear evaporator drains. Most dye and leak indication was at the high side service valve though. I replaced the valve prior to evacuating, charged the system and it is getting very cold now. We are going to see just how long it takes for those evaporator leaks to cause a problem. Sometimes a very slow leak is something that can be tolerated vs cost to repair. 


Now if the gauges show pressures, you'll have to recover refrigerant from the system. You can't tell from from pressures how much refrigerant is in the system. Recover to the machine and the weight of the recovered refrigerant will be measured. 

Recently a system showing 80 psi recovered only 2 oz of refrigerant. You can't go by system pressures!


Once an overall view of the system problems and possible fixes is made you can better make a decision as to what to do from this point. My job is to gather that information for you. Now the refrigerant system isn't all there is to an A/C. There is a climate control system. The electrical and electronic system controls. You can have no problem at all with your refrigerant system but still have no working A/C. I think it makes sense to have your A/C system tested & inspected before just calling around for who can charge it "cheap". 
 
The controls require expensive equipment to test:


The refrigerant requires expensive equipment to handle. The newest refrigerant R1234yf, I haven't made the leap yet. The recovery/recycle machine is $6000 and the refrigerant is $600 for a ten lb canister. At my cost. If you think A/C work is expensive now...........
Hope I gave you some idea what is actually involved in "charging" your A/C. Experience, training & lots of equipment. 

Thanks for your time,

Kenny@ggauto.repair


Friday, January 15, 2021

1997 Lumina Kills Batteries

Violent headline. I have an older car here that consistently drains the battery while sitting overnight. Seems a good candidate for a walk-through of what I do to find the problem. Let's give that a try!

I want to make sure the battery is good and fully charged. In this case the battery on the car is the first casualty. It has been discharged to the point it will no longer accept a charge, even though it is a fairly new battery. 


I'll put one of my new batteries in place so I can make the tests. That will take care of the good, charged battery requirement. 


At this point the car will start and run. This is a good time to make a quick charging system check. All you need to do for that is connect a voltmeter to the battery, note the voltage before you start the car and after the car is running. You should see the voltage increase with the running engine. Good enough.


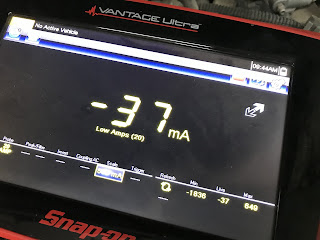
I'm going to take an amp probe and clamp it over a battery cable so I can see how much draw on the battery. Now you want to give enough time for everything to shut down electronically before you chase a draw and that time varies a bit. On an older car like this I'm going to think a half hour is plenty of time. You can connect to positive or negative for your reading. On this car the negative cable is just accessible with a bit of finesse so I'm using it for the test. 


If you can see, the negative cable goes two directions from where the terminal is connected to the post. We'll need to clamp on to each of the two cable sections for testing. 

Good here.


Not good here.


I have found there is excessive draw on the battery. I now have to find the source. First, look around for things that are turned on that should be off. Be suspicious of wiring that doesn't appear to be factory, added accessories such as theft alarms or sound system, look for lights that may not be turned off or that are staying on like the trunk light, the map compartment etc. 

Nothing obvious and you'll have to prepare for tracing the drain. You'll need access to fuse blocks. You'll need front doors open but you'll need to fool the car into thinking they are closed. This car monitors the door latches so I can put the latches into closed position with the door itself open. 

Now we'll be pulling fuses initially, one at a time while watching that meter. When the meter drops we are interested in that circuit. On some systems this part can be a bit more complicated but lets stay on this one. 

I usually start under the hood but end up inside the car. Let's see. 

Okay. When I remove Maxifuse #4 from the underhood fuse block #1 the draw drops to normal. 


This fuse is the power to the instrument panel fuse block inside the car. 


Fuse 28 of the instrument panel block, which is the courtesy lamp fuse. Hmm.


The lamp for the glove compartment is powered by that fuse. 

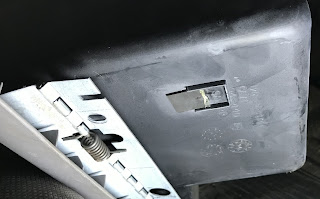
The light is at the rear of the compartment and hidden because of the items inside. The switch to cancel the lamp is at the lower rear and depressed when the compartment is closed. This one however had a foam insert that had slid out of place and a bent mounting bracket for the cancel switch. It was staying on even with the compartment closed. 


Problem found and repaired! Now I have to see about the battery.

Thanks!


Kenny@ggauto.repair