Use the link to reach the article. Transmission Digest Oct. 2023
GM 8L90 #7 Check-ball: The overheat that saved the day
Use the link to reach the article. Transmission Digest Oct. 2023
GM 8L90 #7 Check-ball: The overheat that saved the day
Niehoff DR148 Stoplight Switch $1
New part. Shelf worn box.
For Compatibility use this link and choose Compatibility

MasterPro 2-2103 Ignition Condenser $1
New part. Shelf worn box.
For Compatibility use this link and choose Compatibility

Dorman 81020 U-joint Strap Kit $1
New part Shelf worn
For Compatibility use this link Compatibility

Autolite APP 5224 Double Platinum Spark Plug $1 Each (4 in stock)
New No box
For Compatibility use this link Compatibility

Autolite APP 765 Double Platinum Spark Plug $1 Each (3 in stock)
New Part # Updated to APP 105
For Compatibility use this link Compatibility
BWD EGR631 EGR PFE Sensor $1
New Part Shelf worn box
For Compatibility use this link and choose Compatibility

Motorcraft SP-507 Spark Plug $1 Each (6 in stock)
New
For Compatibility use this link and choose Compatibility

Master Pro EC1609 MAP Sensor $1
New Shelf worn
For Compatibility use this link and choose Compatibility

Autolite AP2545 Platinum Spark Plug $1 each (2 in stock)
New
For Compatibility use this link and choose Compatibility

New
For Compatibility use this link and choose Compatibility

LX346 Ignition Module $1
New Shelf worn
For Compatibility use this link and choose Compatibility

Niehoff DR69ACS Distributor Cap $1
New Shelf worn
For Compatibility use this link and choose Compatibility


There are things that are said about getting older that at a glance seem pretty good. For instance, you have more experience. True. Life experiences are very often helpful but I'm going to say that one thing I've learned from life experience is that some of the things you've learned over time and maybe learned extremely well, no longer apply. It wasn't really helpful in the long term for me to know a lot about DOS or Windows 3.11. Do you see what I mean? I know a lot about automobile systems on cars that no one drives these days. I just hate to dismiss things that were important to know at one time in history and perhaps it would be interesting to someone? I don't know. If you get nothing else from this, get that in diagnosing car problems you need to have an understanding of how the system works to most effectively repair it.
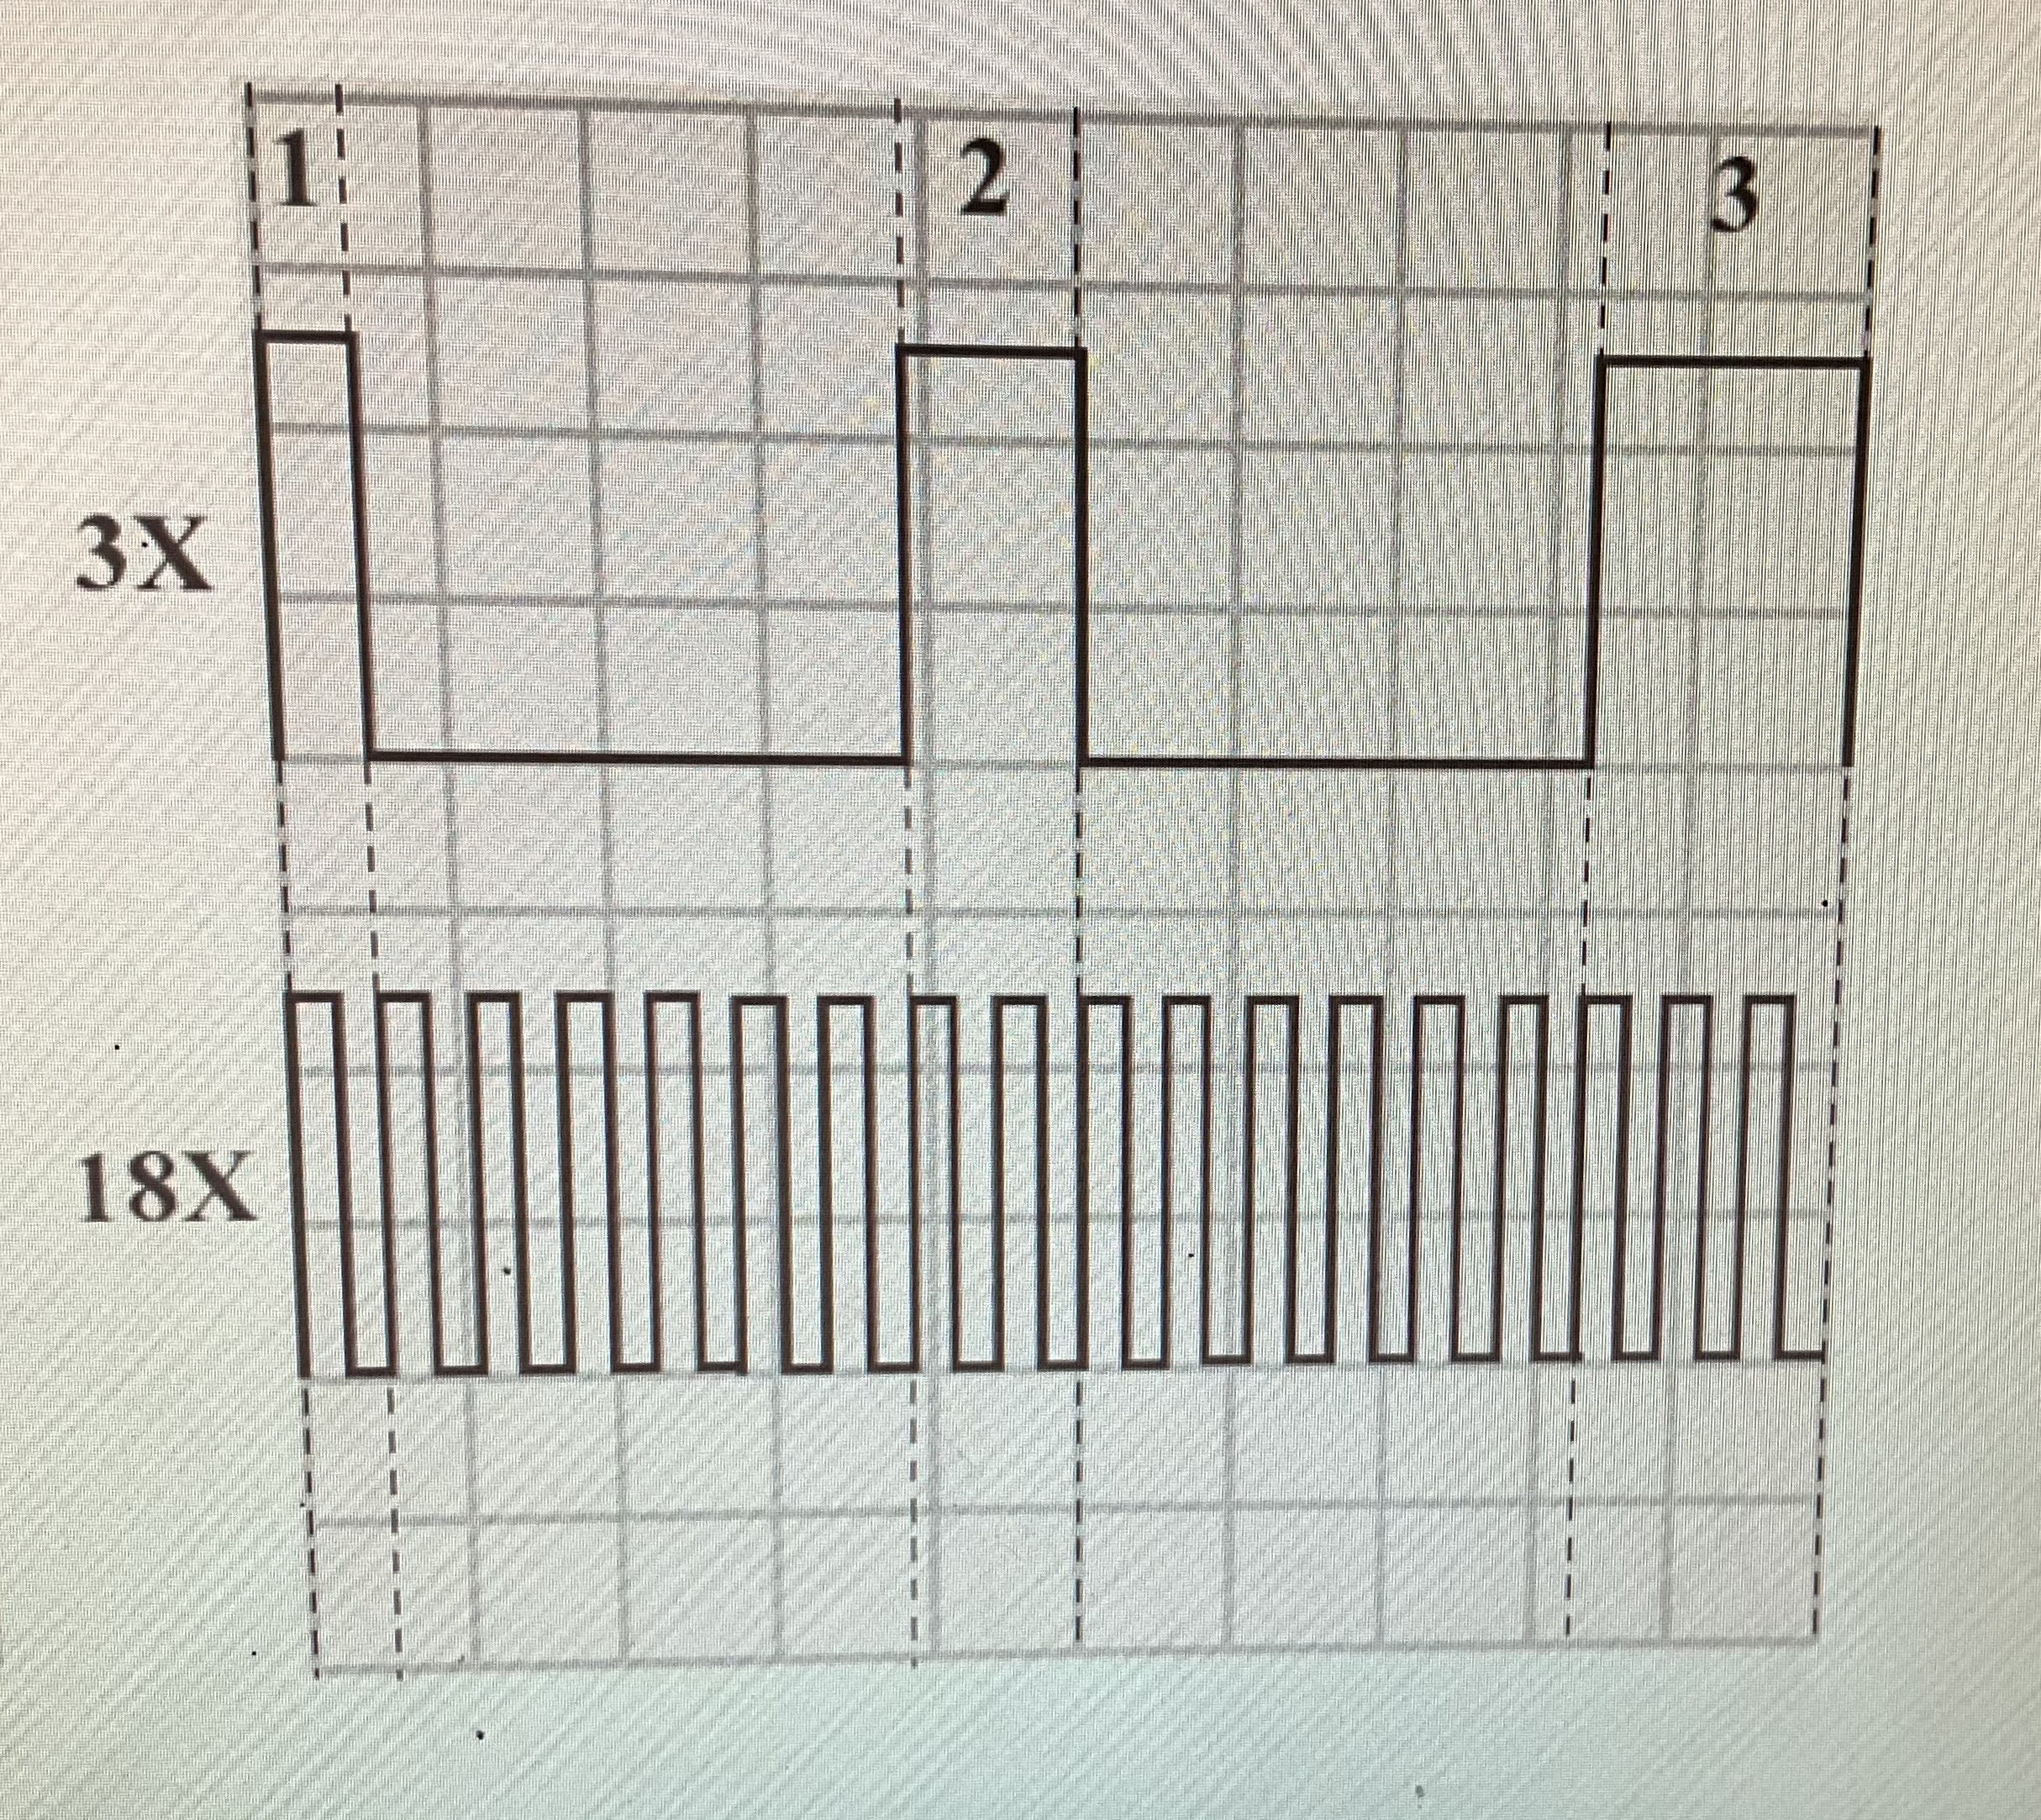
Let's go back to a 91-93 Buick Park Ave 3.8 vin L engine with a recurring trouble code 17. Here is how it works. The crankshaft sensor is a dual signal sensor. Each full turn of the crankshaft is supposed to produce 18 pulses of signal on 18x circuit and 3 pulses on 3x circuit. A reference voltage and ground is provided by the ignition module to the crankshaft position sensor. That voltage passes through the sensor and back to the module. As each blade of the crankshaft pulley trigger wheel passes the through the sensor the voltage drops to 0 volts and becomes your 18x and 3x signal, repectively. The module passes those signals on to the Engine Control Module which uses the signals to determine spark timing and injector pulse. A code 17 sets if the Engine Control Module sees that the 3x and 18x signals from the module aren't in correct sync or erratic. If the ECM sees 240 fuel control pulses since a last spark reference pulse, you set the code. This code will not turn a light on and if the signal quits while the engine is running, it will continue to run.
Normal suggested diagnostics will often find the fault but if your 3x signal is only quitting during running you won't find it with that testing. You'll need to clear the code and attach your scope to monitor the 18x and 3x signals from the crank sensor to the module. Start the engine and watch the 3x for any drop out or missing pulse. If you see the problem you have narrowed the cause down to the wiring, sensor connector or sensor.


Kenny@ggauto.repair
The engine cranks (starter engages and spins the engine) just fine so starter related system is fine. Fuel pressure is easy to test. Like the Sun slogan, we test - not guess. You don't have to use an expensive pressure tester but you do need an accurate one. Ideally with key on and engine cranking you want to see between 35 and 45 psi. of primary fuel pressure.


Now I will assume I have power to the injector because it comes from the EEC Power Relay which also powers the Fuel Pump Relay and since my fuel pump is working I want to check I have spark at the plugs during crank. If I have spark but no injector pulse then I'm looking at fuel controls for problems but if I have no injector pulse and no spark then I'm looking at triggers, such as a crankshaft position sensor.
I have no spark present at the spark plug wire during cranking.

If the computer isn't seeing an engine cranking condition it won't pulse injectors or fire ignition coils. It is a good time to use a scan tool to see that the computer is working and if it notices a fault. The computer is functional and it does have a memory code P0320 which indicates a problem determining engine rpm, which could also point at a bad crankshaft position signal.

If I watch the data pid for engine rpm while cranking I don't see activity.


You can remove the connector cover for access to the wiring and backprobe or you can use a breakout box.

I know which method I'll be using since I don't have a Ford OBDII breakout box. I don't see a crank signal to the ECM during cranking so I'm going to access the crank position sensor.


This one does engage the starter and the engine spins as it should but the truck doesn't start. The technical term for that is a crank/no start condition. The engine cranking properly means we don't have to consider any starter or battery related issues and can consider those as tested and passed. This is when some might say I think its the fuel pump, or similar guess. When you are the one supposed to find and repair you can't just guess and try that. I don't do checks in a particular order, I work with the truck. It isn't the fuel pump. The fuel pressure is easy to test on this, and within specs.

We can move on. Just because I have primary fuel pressure in the rail does not show that I have secondary fuel delivery via the fuel injectors which are electrically operated. The quick test for that would be a noid light to let me know if the injectors are getting power and ground signal during cranking. The light simply plugs into the injector connector and will flash as the injector pulse is present if that system is working.

We have cranking, primary and secondary fuel delivery. We are going to look for secondary ignition (spark) from the coil next. The coil is very easy to access on this truck and we want to look at the connection and ignition coil tower for obvious problems before beginning the spark output test. I see the problem. Rodent damage to the ignition coil wiring harness.


I repaired the wire damage and we are road ready! Diagnostics are about understanding how the system works and forming a logical testing sequence to gather the information you need as quickly as is possible. There are systems that are very difficult to diagnose due to the complexity of the system as designed and occasionally due to the atypical cause of the problem but the same method will apply, understand the system, test logically. You are actually more looking to put aside what will not be the problem so you can more quickly find what is the problem. I call it the Cat in the Hat method. To paraphrase, the way to find the problem is to find what isn't the problem.

See ya next time!
Kenny@ggauto.repair
After replacing a failed lower radiator hose and filling the cooling system I wanted to make sure the electric radiator cooling fan was working properly.


The complaint was that sometimes after braking and then attempting to accelerate, it would not accelerate. I drove this around all morning and it did do that once and no more. After looking at scan data and memory codes recorded later and never again seeing the problem I parked it outside and was about to call the customer to update her. I happened to look outside at the car and the brake lights were on. I traced the brake light problem to the brake light relay being stuck on. I took the relay apart and the first 3 times I pressed it closed with my fingers, it stuck in closed position. After that, worked fine again. I replaced the relay and case closed because the car is drive by wire and because the relay was sometimes sticking on the ecm was trying to prevent engine run away and not allowing proper acceleration, due to thinking brake was on.

I have since learned that Nissan has a TSB concerning the problem and is deleting the relay all together,
Kenny@ggauto.repair
Not sure the date this was published in Counterman Magazine but probably in 2006.


Kenny@ggauto.repair


