Friday, March 24, 2023

Battery Drain Testing (2010 Toyota Camry)

 Word on the street is that I have a machine that will tell me what is draining a battery overnight. No. But I do having testing equipment, system data, experience and patience. I also have a typical procedure, but is adaptable to match testing results. 

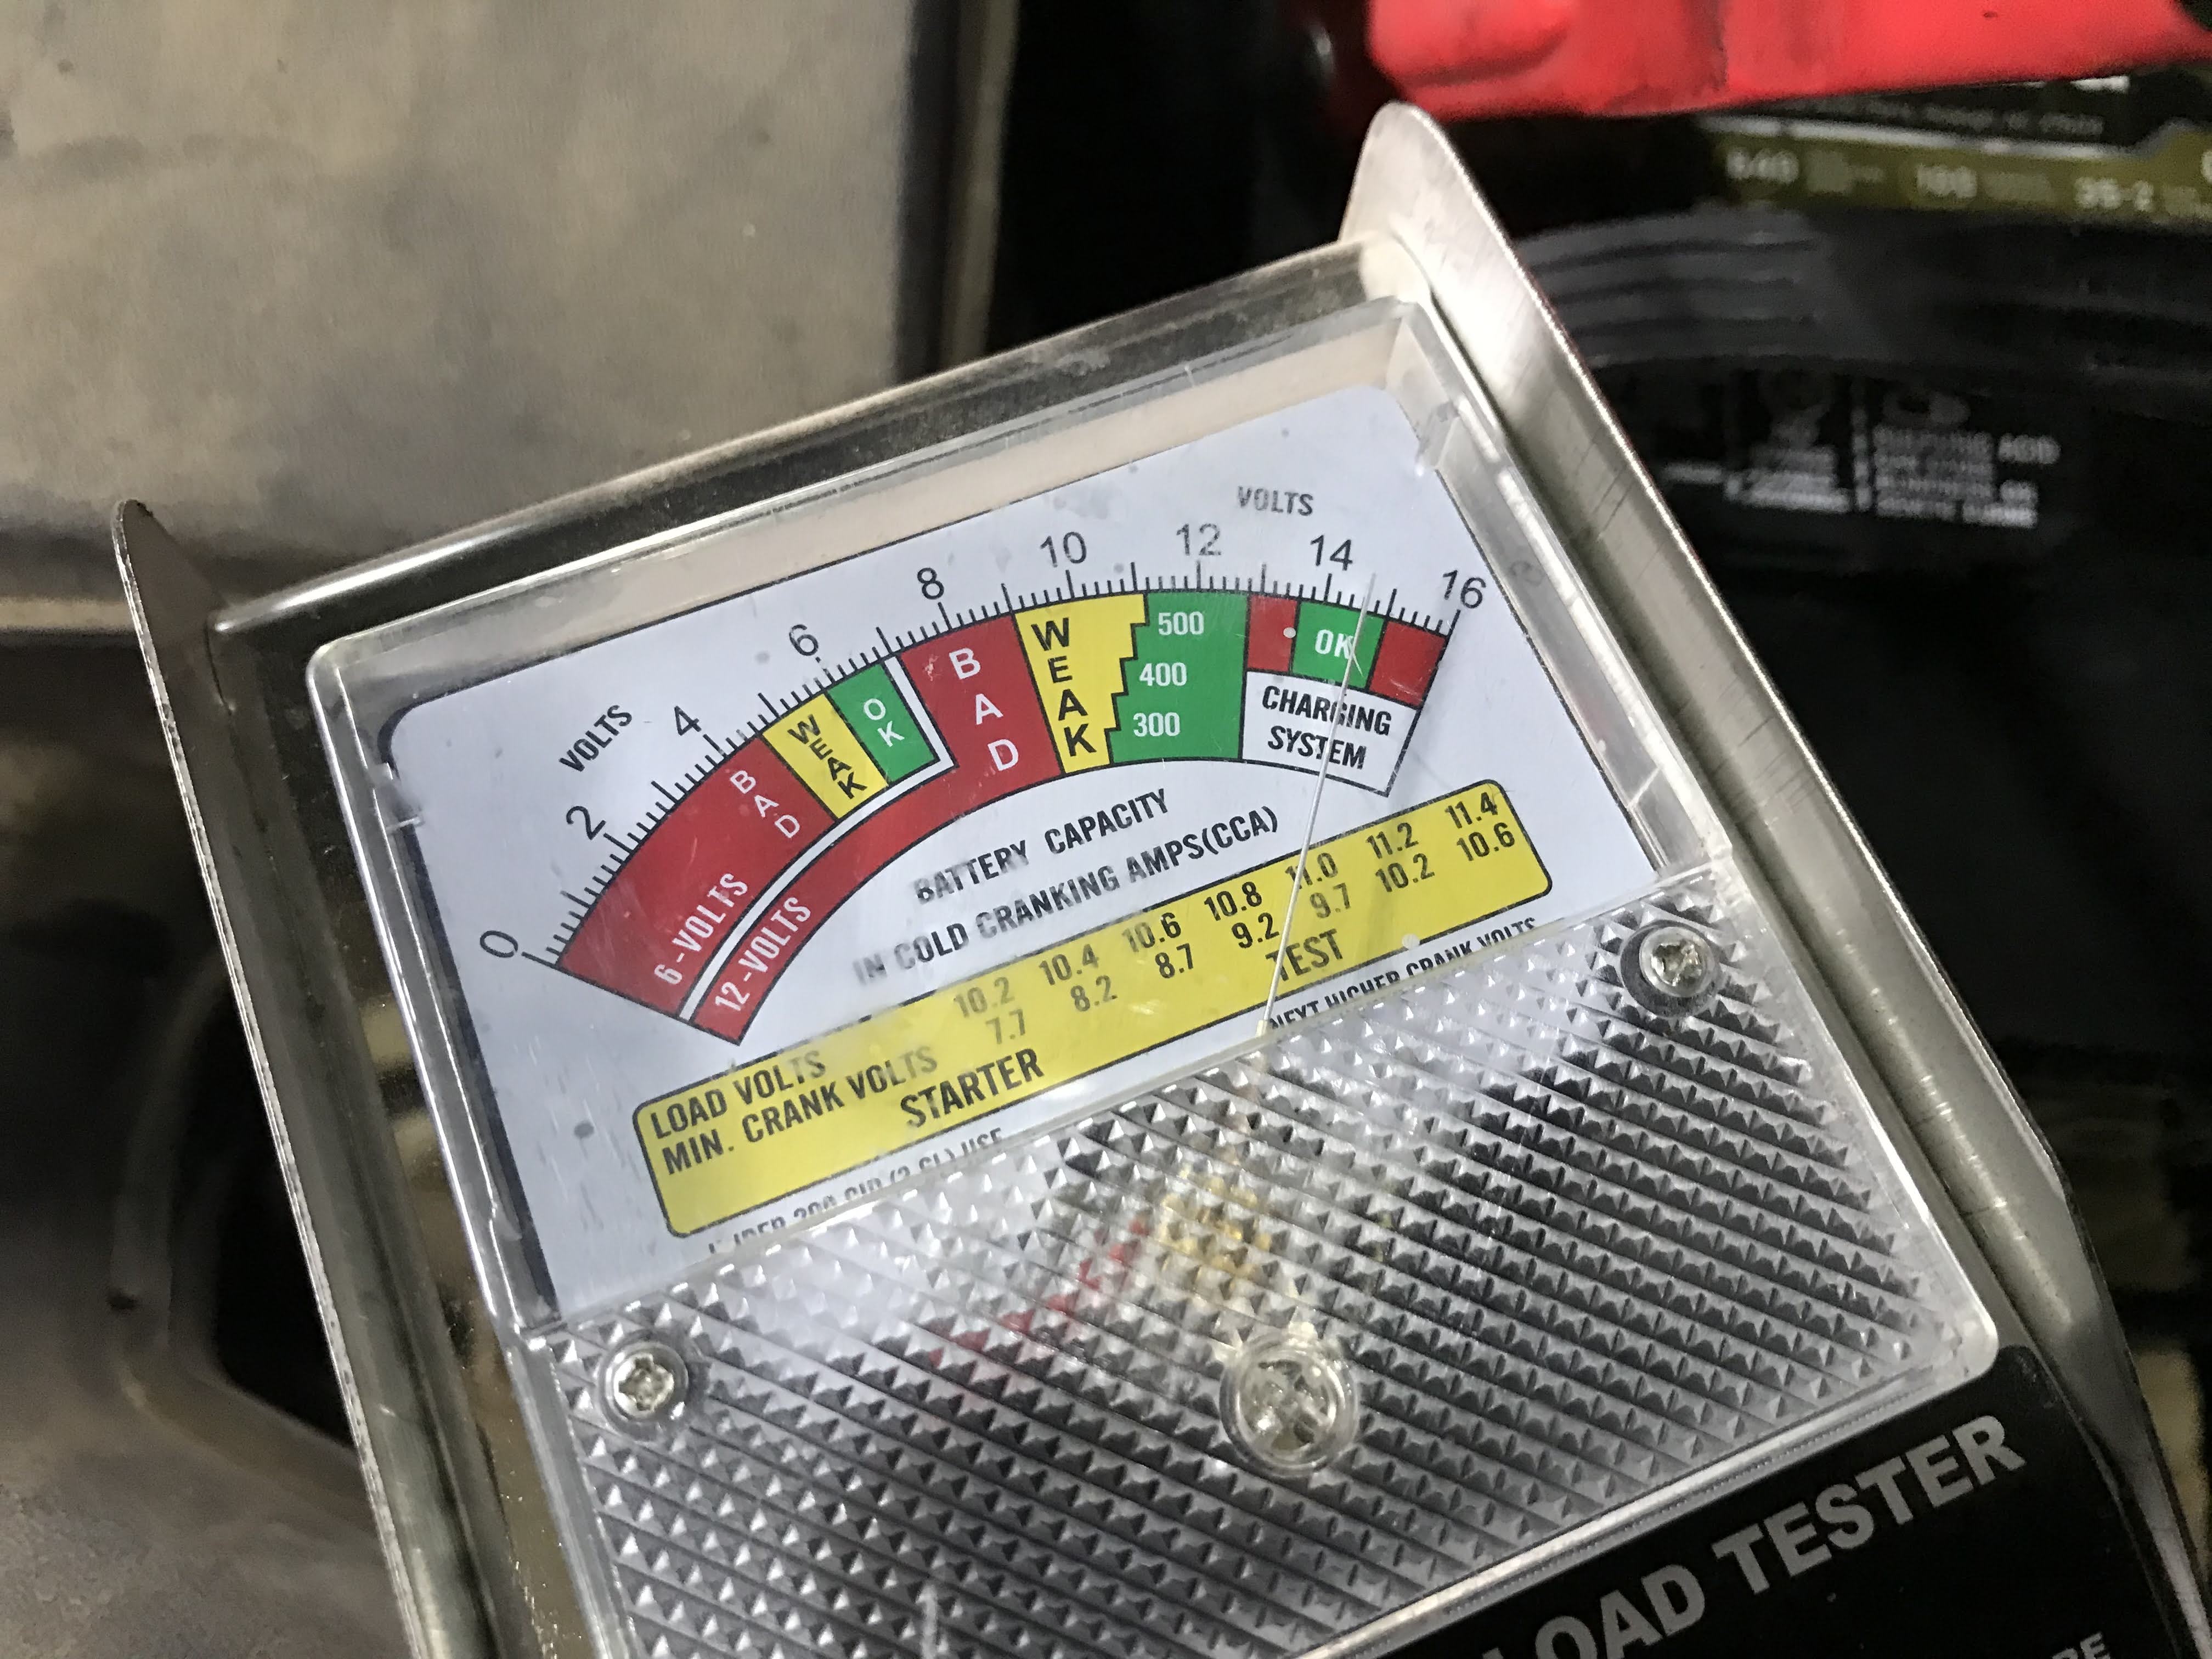
First is, make sure the battery is good and fully charged. This means test and charge as needed. No guessing, no judging based on anything other than testing. This particular battery was new but discharged. You'll need a good, dependable battery charger that reports battery charge condition as a percentage. With the battery still connected to the car, I put the charger on and saw 0%. When my charger sees very low battery condition it goes into "battery saver" mode. Basically that is a trickle charge until the battery begins accepting more charge. So I'm connected and charging in "battery saver" mode, battery is connected to the car. Three minutes later I am showing 99% percent charge, which is a sign of a bad battery or I do have a large drain on the battery and it is interfering with the charge. Disconnecting the battery cables and charging the battery independently gave me a 19% charged reading and more normal charging. I tried testing the battery and saw that I was not going to get by without a charge. 


A slow charge is a good charge so this was going to be an overnight charge. You always want to feel the sides of the battery case for any overheating or watch for any over venting, or acid boil. Internal battery faults can cause dangerous conditions and you don't want the car sitting on an overnight charge unless it is safe to do so. Next morning battery is charged and good. I make the first battery test with a load tester, then the digital tester. 


Reconnect the battery to the car, making sure the connections are good. 

Next step, check the alternator is working properly. At this point all we really have to know is that the alternator is charging the battery when the engine is running. Even though the complaint is a battery draining overnight, the alternator not working properly could cause the battery to be low when the car is shut off, and discharged next morning based on the fact the battery had low voltage when parked. We can do a simple voltage test at the battery and get enough information. Just put a dependable voltmeter on the battery and note the voltage, key off. Start the car and note the voltage with the engine running, if the voltage is more the alternator is charging the battery. That is all we have to know for the purpose of going further in battery drain testing. (Note: if you find your alternator is not working, it does not mean your alternator is bad. It means the charging system needs further testing.)


Prepare for draw and circuit checks. You'll need access to the battery cables themselves for an amp clamp. You'll need access to fuse blocks and relays. Usually there is a fuse block under the hood and one inside the car. You have to set things up for access prior to the testing because computers on a car take some time to go to "sleep", or stop drawing battery current. That time varies according to car, but the important part is that you have to wait for the "sleep" period to begin testing or you will show draw when it is normal and not a fault. 


If you open the door for access to the interior fuses while in sleep mode you will wake the system again. You have to fool the car into thinking the door is closed while it is actually open so that you have access without waking the car. The latch can be closed onto a screwdriver. This car also has a door jamb switch. I clamped the the switch in the depressed position, so as far as the car is concerned the doors are all closed. 


All set? I noticed the door ajar light was still on. The doors were shut, except the driver's but I had the latch and switch in closed position. Now at the beginning of this project, the customer had said the trunk would not close properly and his trunk light had been running the battery down but he had taken care of that. I had kept that in mind and was going to make trunk lamp related circuits a starting point once I was testing draw. But here was the light on that said a door was open and a trunk that didn't close properly so I went to the trunk to look at the latch. The striker is broken and the trunk was being held by  tarp strap. The most important thing though was that the latch was in the open position. I pushed it to closed with a screwdriver, same as I had done with driver's door, and the door ajar light went off.
 

Was that the problem? A door ajar light staying on? I can verify that. There are two ground cables off the battery and two positive cables. You can check current draw on either positive or negative but you have to check any cable that feeds off that side. The two positive seemed to have enough room for the clamp. I use a clamp because I can do that without disturbing the circuit. 


I'm looking for excessive current draw and there is none. I disconnected the sensor at the trunk latch and put the tarp strap back in place. There are limited places to attach a tarp strap on this trunk lid for sure. Now if we had to do this the more tedious way, as in a problem less easily noticed, we would have began pulling fuses, relays, power feeds, etc as we looked for the excessive draw to lead us to the fault. 

This one, not so difficult. 


Kenneth Hayes

Kenny@ggauto.repair

Thursday, March 9, 2023

Diagnostic Tech: 02 Buick Century A/C (originally posted August 2007)

 Thursday, August 23, 2007

Diagnostic Tech: 02 Buick Century A/C

It's been a hot summer and that places a lot of demand on air conditioning systems. Today's project is a 2002 Buick Century, automatic transmission and the 3.1 vin J engine. The complaint is no cold air from the air conditioner. On the drive into the service area I notice the blower works fine and the air flow is from the proper vents. When I cycle the A/C switch on I notice there is no compressor clutch engagement and there is no electric cooling fan operation.
Remember, when you turn the A/C switch on you are making a request to the powertrain control module. If the PCM sees the request and determines the conditions are correct it will engage the compressor clutch and it will engage the cooling fan. Since neither the fan or compressor are engaging I'm going to initially look for a condition that would cause the PCM to "decide" not to comply with the request. The system on this particular car is not automatic temperature control but a manual system with dual temperature control. The manual system looks at fewer inputs then the automatic so *should* be easier to diagnose.
One very basic check is system pressure. If the system pressure is too low, the PCM will not turn the A/C on. I choose to connect a set of gauges to the system for the pressure test. That way, if the system proves to be low of refrigerant I'm ready to charge it without missing a beat.


In this case the stabilized pressures are approximately 120psi so there is plenty of refrigerant and certainly enough to allow the compressor to engage. Since I have started along this path though it's a good idea to continue the journey before looking elsewhere. *I* know the system has good pressure but I don't know if the *PCM* knows it. The PCM won't be looking at a set of gauges, it will be looking at the pressure signal voltage from the pressure sensor. The pressure sensor is located in the pressure line in the area below the air cleaner housing.
I can check the voltage at the sensor with a meter but if I start with a scan tool and look at the A/C pressure sensor data I'll be looking at what the PCM "sees". If I start at the sensor and do the voltage check with a meter and the voltage checks good, I would still have to check the scan tool data. But, if I check the scan tool data first and it is good then there is no need to check the sensor voltage.

I can't miss an opportunity to check stored trouble codes so once I connect the scan tool I do just that. The PCM has stored DTC P0530. P0530 indicates a problem with the A/C refrigerant pressure sensor circuit. This code certainly tells me that I'm on the right path and I pull up the A/C pressure data items.


The A/C pressure readings are certainly out of the ordinary. The PCM sees no voltage from the pressure sensor and calculates a VACUUM condition (-15 psi)! I think it is time to do some voltage checks at the sensor. The pressure sensor has three wires. It has a 5 volt reference voltage, a ground and a signal return to the PCM. As the pressure changes the voltage on the signal return will vary. The PCM will use that voltage signal to determine system pressure.


With the sensor wiring connected I verify the reference voltage and ground are good at the sensor connector. A check of the signal wire shows no voltage so I'm almost ready to condemn the sensor. I need to verify the signal circuit is not shorted to ground. A short to ground would kill the sensor output voltage even with a good sensor. It won't work to disconnect the sensor and check for a ground on the circuit because the pulldown resistor inside the PCM would ground the open circuit. I wouldn't know if there was a short to ground unless I also disconnected the PCM connector. I didn't disconnect the PCM. I cut the signal wire a few inches from the sensor and checked for voltage on the sensor side of the wire. When I found no voltage output from the sensor then I KNEW I had a bad sensor.

FIX:

Replace the A/C Pressure Sensor.

Kenny@ggauto.repair